Always the same, simple joint. That starts to get boring after a while. Would you like to try something new? Rolling a special joint is fun and the end result will leave you stoned out of your mind. Check out the simple instructions on how to roll a cross, twister, pipe, diamond or tulip joint. Make sure you have enough tip, rolling paper and weed ready?
You can´t roll a special joint without the right tools. Do you need tip, rolling paper or other rolling material? You can find everything in our webshop. Make sure you have enough, because to roll a twister, tulip, diamond, pipe or crossjoint you are going to need a lot!
Tulip Joint
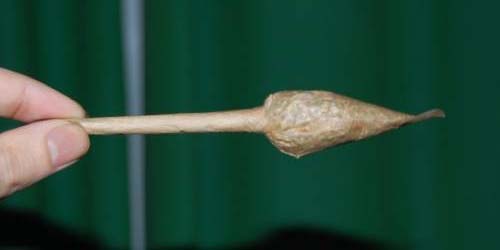
The mother of special joints: the tulip! Who hasn't heard of it. It is a normal joint with a flower on top. The flower is completely filled with weed, hash or tobacco. When you light up the tulip joint you have to be careful of the first few puffs. They are very heavy because you are inhaling a lot at once. A brilliant idea and quite easy to make as well. To make a tulip joint you need the following:
- At least one tip
- At least five long rolling papers
- Lots of weed or hash (about enough for 3 joints)
- Possibly tobacco
Rolling a Tulip Joint
- First, you're going to roll a base joint. A normal, firm joint. It has to be able to support the tulip in the end, so make sure it is nice and firm. Do not roll it inside out!
- It is important to fill the joint completely. So including the tip. Fill the thing up to the brim! Do not close the top.
- Make a paper string from a rolling paper. You do this by grabbing a long rolling paper at two points, which are directly opposite each other, and then twisting it around. So grab the points at the bottom left and top right. Roll like a caramel.
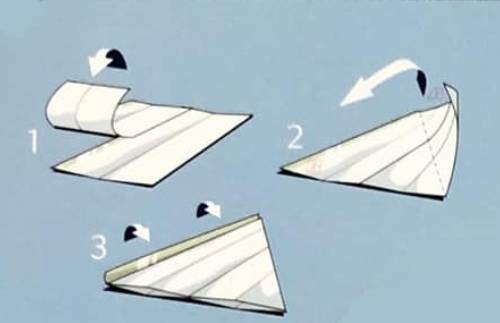
- For the tulip, you will need three rolling papers. Lay them horizontally in front of you, with the sticky edge at the top. Attach them together by licking the sticky edge of the bottom paper, then carefully placing the middle paper on top of that. Then lick the sticky edge of the second paper and place the top one on top of it.
- You have now made a square of rolling papers. Lay this down in front of you with the sticky edge at the top. Take the bottom right tip and bring it toward the top left tip, sort of like a potato bag. Leave only the sticky edge free. Lick the sticky edge and flip it once, closing the potato pocket.
© Joint Rolling Handbook
- After you've let the rolling paper dry for a while and checked the potato bag for strength, you can start filling it with weed, hash or tobacco. Fill it up nicely!
- When the bag is filled hold it with the open side up. Take your base joint and insert it into the center of the tulip a little way down. Twist the remaining paper around the top of the base joint.
- Grab the paper string you made and use it to tie the tulip to the base joint. If the tulip joint needs more firmness, make an additional string.
- The tulip joint is ready. You can light it at the tip of the tulip. Tip: do you want to make the tulip bigger or smaller? Just use more or less rolling paper. Make sure that the base joint can support the weight of the tulip!
Twister Joint
Twister Joint
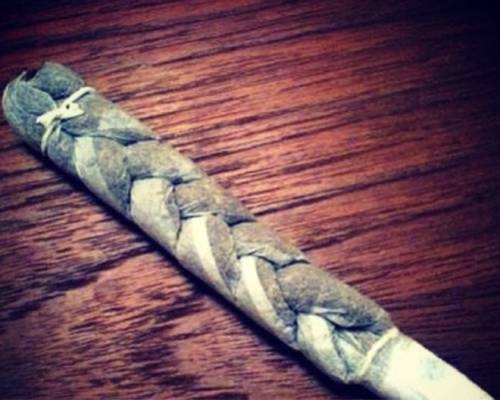
Women can probably roll this special joint more easily than men. To roll a twister joint you have to be able to braid. You twist a number of joints around each other. Two, three, four, five or however crazy you want to make it. It's all possible. When you smoke a twister joint, you actually smoke several at once. In addition, this braided twister looks simply fantastic. So get to work! This is what you need to make a twister joint from three joints:
- At least five tips
- At least four rolling papers
- Enough weed or hash for three joints
- Possibly tobacco
Rolling a Twister Joint
- To roll a twister joint, you need three joints. Twist three that are exactly the same size. If you don't twist them too tightly you can braid better and they are less likely to tear. It is fun to use different strains or to twist one of the three with hash. It is up to you!
- When you're done lay the sticks in a row and start braiding them together. Be careful because the joints can tear if you hold them too hard.
- Do you know someone who can braid? Then ask for an explanation. That always works better. If they are not around, follow these instructions. First take the right joint and insert it between the other two. You will see that it has now become your middle joint. Now take the left joint and put it through the others again. Repeat until you get to the end of the joint. The only thing to remember is that you put the outer joint through the other two each time. Left, right, left, right.
- If you can't braid any further, you need to secure the joint together at the top. You do this by tearing off an adhesive edge from a rolling paper and wrapping it around the top. Just lick it and you're done! Do this also at the bottom if you think the joint needs more firmness.
- Finally, attach the tips together. You do this by wrapping one tip around the other three so you get one big tip. Tear off another strip of rolling paper and wrap it around the tip to attach it.
- Your special twister joint is ready. Make sure all the sticky edges are completely dry before you light it. Enjoy!
Pipe Joint
Pipe Joint
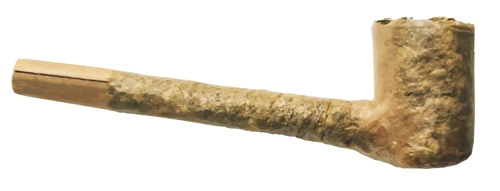
The pipe joint is the simplest special joint to roll. Just roll a regular jonko and make a few adjustments. Before you know it you have a joint that looks like an old-fashioned tobacco pipe. You can still fill the pipe joint with special ingredients such as a little bit of dabs or moonrocks. A special joint with many possible toppings. This is what you need:
- At least three rolling papers
- At least one tip
- Scissors
- A lighter (preferably BIC, it has the best shape)
- Enough weed or hash for two joints
- Possibly tobacco
Rolling a Pipe Joint
- Roll a joint as you normally would. This will be your base joint.
- Take a rolling paper and twist it around the bottom of a lighter. A BIC lighter has a nice oval shape and is therefore very suitable for a pipe joint. Any other lighter will do too.
- Take a rolling paper and tear off the sticky edge. Wrap it around the piece of paper and keep it in place so it stays oval in shape.
- You are going to attach the oval rolling papers to the base joint. The best way to do this is to cut the top of the joint at an angle, creating an open area where the oval rolling paper will fit precisely. Watch the video below.
- Tear off another sticky edge of a rolling paper and stick the paper to the base joint. If you think the oval piece is too big, you can cut some off.
- Then all you have to do is fill the pipe joint and top it off with special ingredients if you wish. Turn it into a sort of cupcake!
- At least one tip (preferably wide tip)
- At least four rolling papers
- Enough weed for 2 large joints
- Something to poke with: a toothpick or throwing dart, for example
- Roll a large, wide tip. This makes it easier to roll a large joint and gives you more firmness.
- Roll a large, thick base joint. Preferably as straight as possible. So not conical. A real log works best, because you need to put another joint through it. Draai een kleinere joint zonder tip. Zorg dat hij dun genoeg is om door de basisjoint heen te kunnen.
- Using a toothpick or other sharp object, poke a hole in the base joint. Approximately in the middle. Try to make the hole a little bigger by gently moving the toothpick back and forth. Be careful, because the joint can break quickly. Make sure the hole is big enough to put the small joint without tip through.
- Poke a hole in the smaller joint, too. Right in the middle! Otherwise it makes no sense. You make this hole so that the air can get through to your base joint.
- Now take the small joint and gently pull it through the large base joint. Be careful and take your time. If you find that it doesn't work, you need to make the hole in the base joint bigger. Do not press too hard. That will cause the joint to tear.
- Make sure the hole in the smaller joint is on the inner side of the base joint.
- Attach the two joint to each other. To do this, use two adhesive edges, which you tore off the cigarette papers. First lick and then fold around the joint.
- Allow the joint to dry before smoking it. Then light all three ends at once for the best effect.
- At least three tips
- At least 7 rolling papers
- Scissors
- Enough weed or hash for three joints
- Possibly tobacco
- You are first going to roll two identical joints. Make sure they are the same size and thickness. It is also very important that you let the tips stick out a little or loosen the bottom. You will have to pull the tips out later!
- Prepare four adhesive edges. Cut or tear these from the rolling papers.
- Place the two joncos right next to each other. Attach the top centimeter of the joint to each other with the adhesive strip.
- Take your scissors and keep them closed. Put it right in the middle between the two joints. You're going to make an angle in both joints, to create a diamond shape. Fold the joint around the scissors or take a stick and place it horizontally between the two joints. Tip: You can wet the joint a little at the spot where it is supposed to bend. When they dry out again, they will hold their shape better.
- Make sure to create a rhombus or diamond shape. To do this, press the bottom of the joint firmly together. Let it rest for a while.
- Now roll a new joint. This one is going to function as the base joint. Roll this one with a large, wide tip for more firmness. Leave the top open.
- Now carefully pull the tips out of the two sticks you rolled earlier and attached to each other. Cut a small piece off the bottom. You will need about half a centimeter of empty rolling paper.
- Here comes the hardest part. Grab the bottom of your diamond (the two joints) and insert it into the top of your base joint. Push it in as far as you can and roll the joint out so that all parts of both joints are filled.
- Using the remaining sticky edges, attach the joint together. Use plenty, as this part should be very sturdy.
- Allow all the sticky edges to dry thoroughly before lighting the top of your special diamond joint.
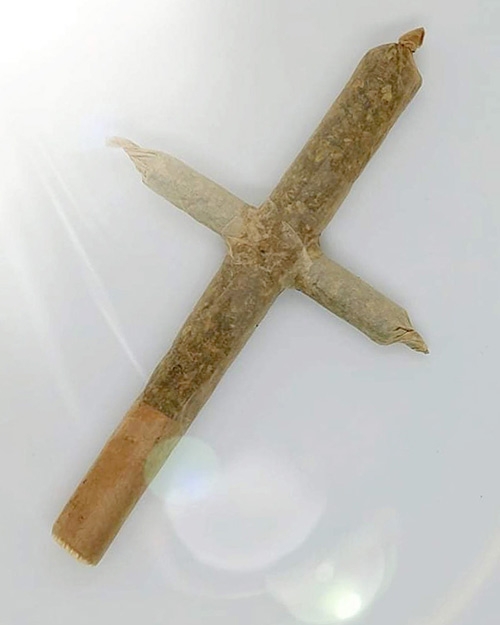
Crossjoint
Crossjoint
A crossjoint does not only look very cool. It also allows you to smoke three joncos at once. A holy cannabis cross is made in no time. Show it off to your friends or smoke it yourself. For this special joint you need:
Rolling a Crossjoint
Tip: you can combine the crossjoint and the twister joint! First make a very large twister joint and then a smaller one without the tip. Put these together for a special end result. It doesn't get more special than this!
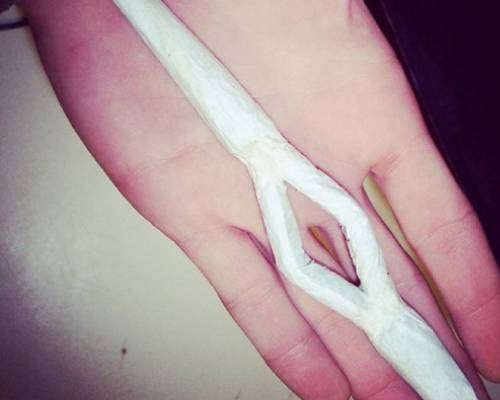
Diamond Joint
Diamond Joint
The diamond joint is the jewel among special joints. It is one big joint with a hole in the middle. The hole is shaped like a diamond. When you start smoking it, everything is fine, but when you get to the diamond, the fun starts. It sort of falls in two and then comes back to one again. You can really call it a special joint! It is a bit tricky to roll, so read the instructions carefully. What you need.
Rolling a Diamond Joint
We understand that the last special joint is very tricky. Watch the video to help clarify the instructions.
Make it easier for yourself!
You don't have to roll a special joint to smoke something unique. Take a look at our cones & joint sleeves. For example, you can find party cones that are up to 28 cm in size. Or how about cones with blunt or transparent rolling papers? We have everything in stock!
