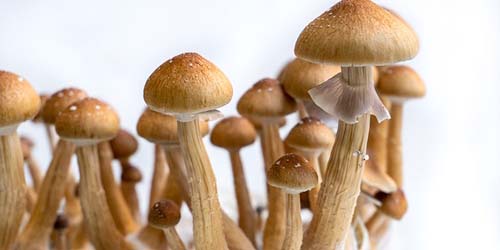
We have cultivated shrooms ourselves. In so doing, we have come across some remarkable facts that we would like to share with you in this article. Rather than just go through the manual again, we are going to give you some background information and natural, practical tips that will help you to get the maximum out of your shroom grow kit.
The instructions and tips provided here are not a manual for cultivating shrooms. You can find the manual here.
Glossary of Shroom Terms
We will be making use of quite a few terms for which you need to know what we’re talking about.
- Cake - A word that we have assigned to the content of the grow kit. By this we mean the substrate (see further on) and the shroom mycelium that grows in it.
- Mycelium - The fungal threads from which the shrooms grow. White fluff in the grow kit.
- Mushroom - The reproductive organ of many fungi.
- Fungus - A collective name for organisms like shooms, truffles, champignons and mildew.
- Spores - The ‘seeds’ of fungi and shrooms. Fine enough to scatter everywhere.
- Substrate - The ‘earth’ in which the fungal threads (mycelium) grow. Comprises a combination of airy vermiculite (a kind of compressed stone) and a food source based on rye and/or rice meal.
And finally the grow kit itself. That’s the plastic tray, including the cake. All shroom grow kits also come complete with an appropriately sized, plastic ventilation bag and paper clips. Sometimes you have to hunt for the paper clips in the box. They can get caught behind a cardboard flap.
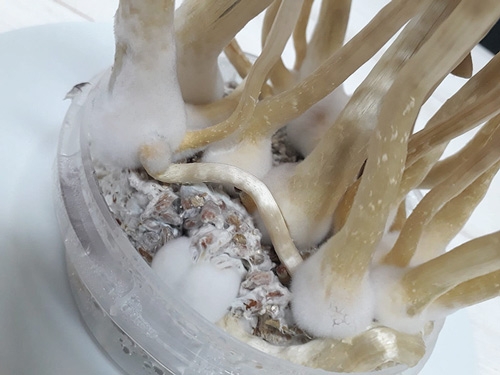
That white fluffy stuff? It’s not a problem! It’s actually the part of the shrooms we call mycelium. The mushrooms are just the reproductive organ.
Infection of the Shroom Grow Kit
Sneezing or coughing into your elbow isn’t just good for your fellow humans. Your little friends are also highly appreciative if you at least turn away from the shroom grow kit. Putting it more strongly, do the same when exhaling. It might not bear thinking about, but as we breathe out a whole lot of tiny particles are released into the air that were present in our noses. Some of these fine particles are spores, the ‘seeds’ of other fungi. Shrooms are hugely sensitive to competition in the grow kit from other fungi. If spores happen to land on the kit and feel at home on the warm, moist cake then there’s a real chance that these fungi will grow faster than the shroom fungi.
Green, black, grey and white
In the photograph below you can see the colours of the shroom grow kit. Green, grey and black on the substrate? That’s not good. This kit hasn’t developed completely. White fluff and blue-green bruising on the shrooms? That’s wonderful! That shows that psilocybin was present. It’s blue in colour.
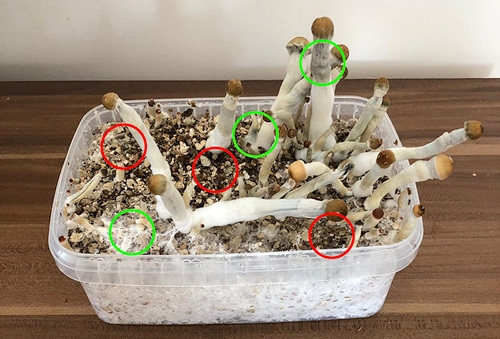
What do you do now with this kit? Harvest what you are able to harvest but don’t cultivate it any longer. There’s little to no point in that.
Green, black or grey marks on the shroom cake tell you that another fungus is a lot more at home in the grow kit than the shrooms themselves. Imagine a kid’s playground with climbing equipment and a troupe of baboons. The chance of other kids wanting to play there is pretty small! For that reason, we need to make sure that the baboons of the fungi world don’t get the chance to invade the proverbial climbing frame. How best can you do that? Read on!
Cultivating Shrooms Lesson 1: Work Cleanly!
Working with a shroom is like an open-heart operation. Set to work with surgical precision and a healthy dose of germ phobia. That will reduce the chance of green, grey or black fungi availing themselves of a snack on the nutrient medium. For example, proceed as follows:
- Put on a sterile gloves before opening the kit, aerating or harvesting a run of shrooms.
- Roll up your sleeves when working in the bag. You should disinfect your hands and lower arms properly with hand alcohol.
- Pour boiling water over the fork you use for pricking holes in the cake. Put on sterile gloves.
- Rinse off the exterior and lid of the shroom grow kit as far as possible. You can also rinse the lid with hot water provided the lid is not on the kit. The last thing you want to do is pour hot or boiling water in the grow kit. The shrooms would not be able to withstand this.
- You can also disinfect the water you use to moisten the grow kit by first boiling it and then allowing it to cool off (important!). But that is not necessary. We represent the greatest threat to getting large, strong shrooms. So protect the shrooms from yourself.
Shroom grow kit: Increasing the yield
You’ve probably had enough advice about working in a hygienic way. Time for a nicer question: how can you cultivate more shrooms? Actually, there aren’t any advanced growing techniques like those for weed cultivation, that you could try out at home. The answer comes down to making the conditions as favourable as possible. So, just what are the most favourable conditions for shrooms in a complete shroom grow kit?
Temperature - Shrooms love an ambient temperature of 23.5° C. The closer you can get the temperature to this point, the better. Room temperature is usually 19 to 21 degrees. That’s just a bit too fresh for a tray of shrooms. They should come up when the temperature is over 20 degrees but it might take longer than you expect and in all probability they will be a bit smaller. For that reason, there is a safe and accurately adjusted infrared heating mat that makes the shroom grow kit exactly warm enough at room temperature. The mat does not feel hot or warm but it will bring your cake up to the correct temperature by means of thermal radiation. The lower the temperature, the more slowly the mycelium and the shrooms grow. That’s the reason why you should keep a kit in the refrigerator if you’re not cultivating it.
Humidity - It’s probably no surprise to you that fungi love damp places. Shrooms do well at a relative humidity around 90%. And it doesn’t need rocket science to achieve that. Each grow kit comes with a plastic bag in which to place your shroom kit to produce that humidity. You fill the bag (not the grow kit) with water that slowly evaporates. The infrared heat mat also helps in that regard. If you close the bag with the paper clips which are also supplied, the water vapour has nowhere to go and the humidity will rise. It’s that simple. The following point is more of a challenge.
Fresh air - In the same way as people and other animals, shrooms need to breathe. So, fresh air is a must. If you open the bag each day to let in fresh air you get the right balance between humidity and fresh air. But please note: do not breathe into the bag.
Light/Sunlight - Do not place your grow kit on the windowsill. Mushrooms cannot withstand temperature fluctuations. Especially since they are in a plastic bag next to the window, it is like a greenhouse during the day. They quickly overheat, causing them to wilt before they can grow large. Place your magic mushrooms in a light spot once the first tiny mushrooms (pins) appear; usually after 15 days. Tip: magic mushrooms are supposed to do very well in blue light to maximize yield. So if you have a cool colored grow light you can experiment with it!
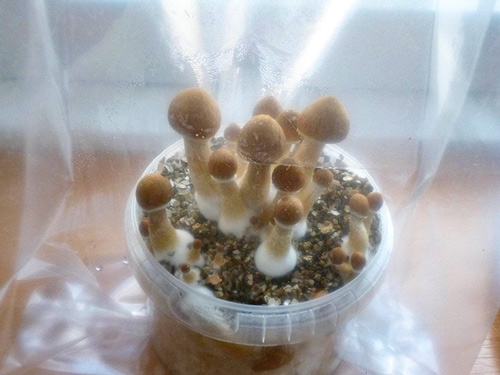
With a bit of water you can keep the humidity at the right level in the supplied bag. This is actually a good time for harvesting them. Don’t allow the cap to open.
We should say that it doesn’t make a lot of sense to want to grow large shrooms, whereas growing more shrooms does make sense. Don’t let shrooms keep growing simply to get more weight on the scales. Once the cap opens up, the shrooms lose strength. You then have more to chew on but the capacity for tripping is at most no more than when the smaller shroom was still closed. You should harvest shrooms with an eye on potency not based on who has the longest and thickest.
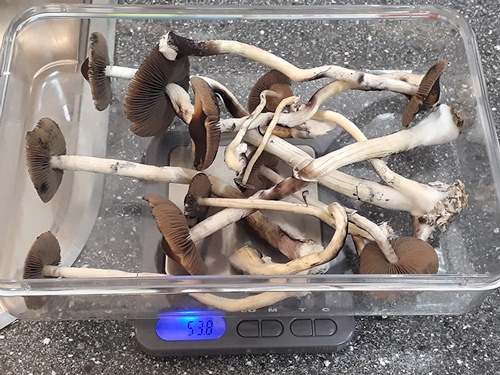
53.8 grammes of McKennaii shrooms from a medium-size shroom grow kit (1200 cc). Not wrong, but make sure these young ones are not harvested too late. The cap has split open completely and a good portion of the potent spores has already vanished.
Differences between Shrooms
During cultivation we ourselves have come across a number of remarkable differences. Some kits came up quicker than others. We think this is down to the type of shrooms. You can see here what our findings were and what makes the shrooms unique.
» Magic Mushroom Grow Kit Thai - Psilocybe cubensis thai are the beginners magic mushrooms. Although enormously potent, they are less intense than the mushrooms below. Cultivation time: 16 to 21 days.
» Magic Mushroom Grow Kit Mexican - Psilocybe cubensis mexicana are the magic mushrooms that started it all. When you say "shroom" you probably mean these guys who were brought to the West by R. Gordon Wasson. Medium strength mushroom. Cultivation time: 15 to 20 days.
» Magic Mushroom Grow Kit Golden Teacher - Psilocybe cubensis aurumescens is a beautiful magic mushroom to look at. With its gold-coloured hat with white speckles, it is the most beautiful in our collection. And the most philosophical! Cultivation time: 11 to 15 days.
» Mushroom Grow Kit McKennaii - Psilocybe cubensis McKennaii owes its name to the one who really made magic mushrooms known in the Western world: Terence McKenna. They are the strongest cubensis mushrooms in our range and definitely not for the novice user. Cultivation time: 19 to 22 days. Below you can see a must-see from Terence McKenna on youtube.
» Hawaiian Magic Mushroom Grow Kit - Panaeolus cyanescens is a special kind of magic mushroom with different instructions for use. The stated temperature and humidity are not entirely valid for this very strong species. Casing soil is also supplied with the mushroom grow kit, which these slender mushrooms really need to grow. The detailed description is on the product page.
Harvesting and Drying Shrooms
When the time comes to harvest shrooms, you can exert some influence on the strength of each shroom. As you can read in the manual, the best time to harvest shrooms is the moment at which the flesh just under the fungi’s cap begins to come loose. This is the point at which the shrooms contain the biggest amount of psilocybin. If you wait until the cap comes loose from the stalk, the spores fall out from the cap and the shroom gradually loses strength. But pinpointing the precise moment is not easy. You want to harvest all the shrooms at the same time. That prevents unnecessary chance of infection. It’s up to you to judge when most of the shrooms are ripe (enough) for harvesting. Use the picture below as a guide, or the manual of course. Here, a yellow circle means a bit too early. Green tick? Harvest it! And a red cross means a bit late. But: harvest them all when the majority are ripe!
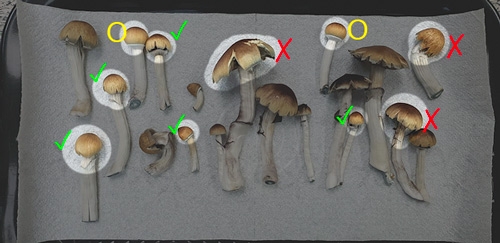
The ideal moment for harvesting shrooms?
If you are drying your shrooms, make sure they get sufficient fresh air. Spread them out on a plate or in a dish without touching each other. If you cover the shrooms with a tea towel, make sure it doesn’t touch the shrooms. For example, put a short glass in between and make a kind of tent. Looking for more information about drying and storing shrooms? Check out this article!
In Conclusion
Did you harvest your shrooms at the right time? If so, then naturally you’ll want to try them. Choose a good opportunity and, before you start, focus on a question that’s important in your life. An aimless trip will fast become chaotic and won’t be as mind-expanding as it would if done in a completely conscious manner. Furthermore, there are 2 things you should take into account: set and setting. Organise it so that the environment or setting is relaxed and safe, and you are accompanied by a sober tripsitter. Make sure you are feeling good, comfortable in yourself and fit to start the trip. You can then take on the world.
Would you like some tips on eating shrooms? If so, check out this blog!
Have a safe trip!
