McKennaii Shrooms are one of the strongest that you can cultivate in a grow kit. Tripping on these magic mushrooms is totally out-of-this-world! You can grow them yourself with a shroom grow kit from our smartshop. To make things easy for everyone, we have compiled a growing report. Would you like to cultivate 300 grammes (or even more) of fresh McKennaii mushrooms within 30 days? Then take your lead from this growing report and do it even better yourself!

Summary of this Growing Report
|
Shroom Variety |
McKennaii (Psilocybe mckennaii) |
|
Grow Kit Contents |
1200 cc |
|
Total yield |
300 grammes |
|
Yield first crop: |
207.36 grammes |
|
Yield second crop |
59.04 grammes |
|
Yield third crop |
33.48 grammes |
|
Time to first harvest |
19 days |
|
Total duration of 3 crops |
29 days |
McKennaii Mushrooms
McKennaii mushrooms are named after Terrence McKenna. He was an American ethnobotanist, lecturer and author who is in part responsible for the reputation shrooms currently enjoy. Together with his brother Dennis, he was an ardent supporter of the responsible use of pschedelics. The fact that shrooms are accepted in many parts of the world, is partly down to him. Terrence McKenna got his own variety of shrooms. Not everyone believes that he was the one who discovered McKennaii mushrooms. The variety Psilocybe had apparently been discovered earlier. The story goes that a well-known mycologist named the variety after Terrence McKenna as a tribute to him Whatever the truth, it makes a good story!
McKennaii mushrooms are one of the strongest shrooms in the world that can be grown in a shroom grow kit. It’s the most visual variant from our range of shroom cultivation kits. With a McKennaii growkit you can cultivate a substantial portion of strong shrooms within three weeks. McKennaii Magic Mushrooms are the most visual variant from the collection of complete shroom cultivation sets. Under the influence of these shrooms you can experience trips which are completely out-of-this-world. It is the strongest recreational shroom but can also be used for spiritual and shamanistic purposes. These shrooms can make you nauseous. That is part of it but the brief feeling of nausea will pass on its own. Rather not? Then take a lower dose or try a different shroom from this particularly potent McKennaii. Are you curious as to what the right dosage for you is? If so, consult our Shrooms and Truffles Dosage Calculator!

Terence McKenna during a panel discussion at the 1999 'AllChemical Arts Conference', held in Kona, Hawaii. Photo: Jon Hanna. CC BY-SA 3.0
Before launching into the growing report, we want to emphasize the most important rule: work hygienically! A shroom grow kit can become infected very easily and then the shrooms are doomed to failure. Keep to these rules:
- Always wash and/or disinfect your hands and forearms thoroughly before getting started with the kit
- If you have them, use sterile gloves and a face mask
- Never breathe into the bag or blow anything off of the grow kit.
- Rinse with boiled water first anything you use to touch the grow kit
- Work extremely cleanly
Cultivating McKennaii Shrooms - Our Growing Report
It’s high summer when I get the McKennaii shroom grow kit delivered to my home. The temperature throughout the house is 25 to 26 degrees Celsius and there is no air conditioning. There is nowhere in the house that’s any cooler. For that reason, I’m unable to start cultivating the shrooms. The temperature is too high for that. I need to wait until the temperature in the house is about 23 degrees Celsius – the ideal temperature for growing shrooms. In the meantime I put the grow kit in the fridge. It’s three weeks later (middle of August), before I can actually begin to cultivate the McKennai shrooms! What if it’s not warm enough in your house? In that case, we recommend a shroom heat mat which always provides the right temperature for your shrooms via infrared radiation. Safe and long-lasting!
Day 1: preparation of the McKennaii Shroom Grow Kit
I get the 1200 cc McKennaii shroom grow kit out of the fridge and open the box. Now I can see the McKennaii grow kit, a ventilated plastic bag and 2 paperclips. You need all of this. I’ve done this many times before, but just to be sure I don’t miss an important step, I keep the Shroom User Instructions close by me the whole time during the preparation.
First of all, we put the kettle on and I wash my hands and forearms thoroughly. I allow the boiled water to cool down and then use it to rinse clean the outside of the kit. Don’t use any cloths, just your clean hands (preferably with gloves). Once you have rinsed the kit clean, you can open it carefully. Rinse clean a fork with the boiled water and then prick a few rows of holes in the cake (by cake we mean the content of the grow kit). Now let the boiled water cool down to room temperature and pour it into the kit up to the edge. Put the lid on and place the kit for roughly 10 hours outside the fridge to soak in. Make sure the kit is not in the sun.

A foretaste of the end result: dried McKennaii mushrooms
The next morning we set to work again. The McKennaii shroom grow kit has been left to soak in for around 10 hours and is still full of water. I wash my hands thoroughly again and boil some water. I open the lid at one corner and leave it ajar. I then gently pour all the water out of the kit. Then I rinse off the lid of the grow kit with boiled water and do it back up. Now I can easily rinse off the kit once again with boiled water that has cooled down. I then remove the lid again and position the kit ready.
We take the plastic bag and fill this with a layer of lukewarm tap water. Approximately 250 ml (2 to 4 cm in the bag) should be enough. Now pick up the kit with your spotless hands and forearms and place it in the bag. As soon as it’s in, check the water is not going in the tray. The cake has to stay dry during the cultivation. We fold the bag 2 to 3 times at the edge and seal it with the 2 supplied paperclips. Find a good place in your house that’s not in direct sunlight. Just as in nature, the kit stays in the shadows. But not pitch dark in a cabinet or anything like that.
Day 2 up to day 12: the McKennaii Grow Kit is left to do its work
You’ve actually done some 75% of the work on the first day. In the short period of 3 weeks following that, it’s a case of patiently waiting while the McKennaii shroom grow kit does its work. It’s important to keep monitoring the grow kit. Shrooms need to benefit from optimum conditions during the entire cultivation period. Only thus will you get the best and most powerful McKennaii mushrooms.
After about a week, we notice that the condensation on the inside of the cultivation bag has virtually gone. That’s not what you want! Shrooms need a moist space in which to grow. You can tell by the condensation whether it’s sufficiently moist in the bag. And on day 8 of the shroom cultivation that wasn’t the case. Therefore, we get a clean plant spray and fill it with cold tapwater. We open the bag carefully and spray the inside wet. Be careful not to spray the cake! This is disastrous and might mean the end of your cultivation. We reseal the bag and monitor the grow kit each day to see if it needs more moisture. We also check the temperature in the room constantly. That’s all we have to do.
Day 13: the first McKennaii Shroom is born
It’s a bit earlier than expected but on day 13 I spot the first McKennaii shroom in the grow kit (normally it’s only after about 15 days). It’s barely visible. You have to look closely to see the tiny cap poking out. Now you know that within a few days you can look forward to large shrooms. Be on the lookout!
Day 19: the first Shroom Harvest
I get a shock when I come home from work in the evening and examine the McKennaii shroom grow kit. It’s bulging right out! The shrooms are ready for harvesting. Or rather: unfortunately, I’m already a bit late. I can tell that by the veil under the shrooms’ caps. In the case of some of them, the veil is already detached and you don’t want that. The best moment to harvest shrooms is actually when the veil is just threatening to come loose but is still attached to the cap.

A full McKennaii Shroom Grow Kit, ready to be harvested. You can see here that on many of the shrooms the veil has already detached from the cap. Yes, it could be better!
The most likely moment for the kit to become infected during cultivation is when harvesting. It’s therefore vital for you to work with the utmost hygiene and not leave the kit in the open air for too long.
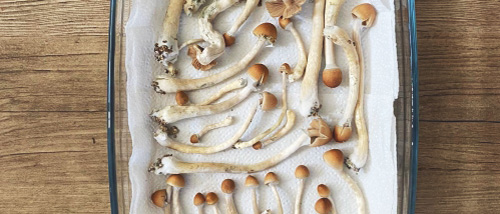
I wash my hands and forearms thoroughly. I open the bag and look to remove the shrooms from the filled grow kit. I do this by holding the outside of the grow kit and pushing it upwards as it were. This prevents you from contaminating the grow kit when handling the bag. The grow kit is now out of the bag and we are going to harvest the shrooms. First of all, I line a baking dish with kitchen roll. I’m going to put the shrooms in this to dry. You harvest shrooms by grasping each one by the bottom and gently twisting it round. You’ll notice then that the shrooms come loose without damaging the kit. There are so many shrooms that I need 2 baking dishes. The yield from the first crop: 207.36 grammes
I lay the shrooms then in the baking dish. I’m careful to keep each shroom from touching the others. Then I take a clean, dark towel and place this over the baking dish. To make sure that the towel doesn’t touch the shrooms, I put a cup upside down in the centre of the baking dish. I also fold the towel back at one corner so that the shrooms still get some fresh air.

This is what to do with harvested shrooms! Around 200 grammes of fresh shrooms are drying under the towel. The corner in the top left is kept open for fresh air.
Once we have harvested the first crop, we get the kit ready for the second crop. Fill the kit with cold water and seal it with the clean lid. Place the kit in a place outside of direct sunlight again and leave it to soak in for a few hours again. We call this the cold shock. In this way, the kit is reset as it were and you can cultivate another crop. You do this in exactly the same was as described above. Remember: always work extremely hygienically!
Day 20 to day 23: McKennaii Shrooms Grow Kit crop 2
After the kit has soaked in for a number of hours, we start all over again. Work hygienically in exactly the same way as on day one. Make sure there is condensation on the inside of the bag and that the temperature is nicely around 23 degrees Celsius. The second portion of McKennaii mushrooms is on its way!
Meanwhile, the shrooms from crop 1 are busy drying. After 2 days, I turn over each shroom. This helps them to dry better. After 5 days, the first crop has dried. See here the end result.

Approximately 23 grammes of dried McKennaii Shrooms
Day 24: Crop 2 Harvesting
Early in the morning on day 2, I see that my shrooms are ready for harvesting. The veil has become detached only from 1 or 2 shrooms. The veil on the others is still neatly attached to the cap (the right moment). Fully ready for harvesting. I wash my hands and forearms thoroughly, and set to work in the same way as on day 19.

The second crop of McKennaii mushrooms in the grow kit! A yield of 59.04 grammes.
In the photo you can see that the veil has become detached from only the rearmost shroom. All the rest are still nicely attached. Just the right time for harvesting then! I get another baking dish and line it with kitchen roll. I lay the shrooms such that they are not touching each other. Crop 2 is ready for drying.
The second crop of McKennaii mushrooms. Glass in the centre, towel on top and they’re ready for drying!
Day 25 to day 29: Crop 3
We organise everything exactly the same as previously described. Hands and forearms are cleaned. The cold shock: cold water in the tray and left to soak in for a number of hours again. Grow kit rinsed. Back in the bag. Monitor closely and when it’s time, harvest the shrooms.

The third crop of McKennaii shrooms: 33.48 grammes. Waited a bit too long to harvest again. Just look at the veils under the cap. You want to see more closed caps than open ones.

The third crop of McKennaii shrooms – ready for drying.
We have reached the end of this McKennaii Shrooms Growing Report. Would you too like to cultivate 300 grammes of fresh McKennaii shrooms? Then use this guide as a template. But be aware that it’s better to harvest at the right moment than to wait for a bigger yield. In the end, you want a more powerful effect and less chewing, don’t you?
What can you do better than this grower? Harvest at the right moment! Both crop 1 and crop 3 were actually harvested a little too late. So, keep a good eye on things and make sure you pick the right moment to harvest!
Do you have any further questions? Look at the user guide and/or get in touch with our customer service.
Storing Shrooms – Eating and Tripping
After you’ve dried your shrooms, you can start tripping. But obviously it would be irresponsible to eat them all in one go. So store them in the right way. Below you’ll find a number of related blogs with more information about storing shrooms, eating shrooms, a dosage calculator and other cultivation tips. Take advantage of them!