Drying weed might appear simple but in reality it is not that easy. A lot of people make mistakes during this phase of the cultivation. It’s possible to do lots of things wrong when drying and curing weed. Yes, admit it. What’s worse than sweating for weeks and then messing it all up in the final phase. In this article we explain how to dry and cure weed quickly - and properly.
Because drying and curing weed is a complicated subject, we cover the following points in this article:
- When is Weed Ready for Cutting and Drying?
- Factoids, Rules of Play and Ideal Conditions
- Drying Weed Quickly - But Not Artificially
- Weed Cutting Affects Drying
- Different Drying Techniques - Drying Weed in a Number of Steps
- How Long should Weed Dry
- Curing Weed after Drying
- Storing Weed
When is Weed Ready for Cutting and Drying?
Before proceeding to dry your weed, it’s vital to harvest and cut it at the right time. To figure out the perfect timing, you need to keep looking carefully in the final weeks at the trichomes on your weed. These are the white or brownish resin glands on the buds. To distinguish these with the naked eye you have to look really hard. A Microscope is a handy tool for this. This is a convenient pocket microscope with which to keep a close eye on everything.
Always keep in mind: observation is the basis for a good harvest. You can tell by the trichomes/resin glands when it’s time to cut and dry. For more information read our blog. ‘‘.
Factoids, Rules of Play and Ideal Conditions
There are a number of things to consider when you intend to dry weed. Hence this list so that you don’t get any surprises. Every cultivator who wants good quality cannabis must adhere to these rules of play. So please read carefully:
- Keep in mind that you will lose some 65 to 80% by weight when you dry your weed. 65% loss by weight is something to be happy about. This doesn’t happen very often.
- It is also the case that after growing and flowering, weed can go on to develop mould.You can prevent this by carefully reading through the remaining points in this list.
- Very important: darkness. It would be a shame if your weed lost some of its potency, wouldn’t it? For that reason, always dry it in a dark place. Light breaks down THC and that would be a pity.
- For the first few days at least, drying weed will produce an enormous odour of weed.Do you want to do your neighbours a favour? Then buy a carbon filter. They are universally available and you’ll be doing a favour not only for your neighbours but for yourself as well. Masking the odour of weed? Then buy a carbon filter.
- The ideal temperature for drying weed is between 17 and 21 degrees Celsius. We recommend you keep the temperature at around 20 degrees Celsius for the first 3 to 4 days, and then switch to the slightly lower temperature. This will give not just the moisture but also other substances in your cannabis the opportunity to dry out / vapourize. In any event, make sure the temperature does not go above 21 degrees Celsius.
- The ideal humidity for drying cannabis is around the 50% mark. This prevents your weed from drying out too much and denies mould the opportunity of forming. It can be tricky to keep the humidity at the right level. Useful tools for this are humidifiers and hygrometers. These can be found all over the Internet or purchased in many shops. Are you going to dry a large quantity? Then we strongly recommend you buy one. The wrong humidity will do more damage than you’d like. Dessication, mould and other nasty things could be the result.
- Give your buds enough space. They like to be hung or laid down in a special dying net. This way they have a larger drying surface, the air can do its work at every part of the buds and you avoid moisture spreading from one bud to another. Moreover, you give mould such as bud rot no opportunity.
- Good ventilation is vital. Fresh air is necessary to allow cannabis to dry off as ‘freshly as possible’. By providing the drying area with fresh air, you stop mould getting the chance to cause damage to your lovely green buds. But don’t let the fan blow out its air directly onto the weed. Artificial drying techniques are bad for the quality of the weed.
Drying Weed Quickly - But Not Artificially
The Internet is inundated with growers looking for ways of drying weed quickly. But the fact is: if you want to get the best quality weed, you can only achieve this by striving for the perfect conditions. It’s often the case that the longer the process takes, the better the weed. Artificial means can get the weed to dry quickly but the green gold’s quality will go downhill. Things which you absolutely must not do:
- Dry weed in the microwave
- Dry weed with a hairdryer.
- Dry weed in the oven or over the stove
- There should be no direct wind present when drying
Most of the things you shouldn’t do involve high temperatures. More will be lost at high temperatures than you would like. In addition, some of the substances in weed (such as chlorophyll) need more time to vapourize / dry off than water. Temperature is not involved in this. To make matters worse, your weed will also become much too dry. All this leads to the weed being less tasty and producing a tickle in the throat. In short: it may seem like a good idea to dry weed quickly but it isn’t. Let the microwave do what it’s supposed to and let nature take its course. Pursuing the conditions that were mentioned at the beginning of this article is the quickest way.
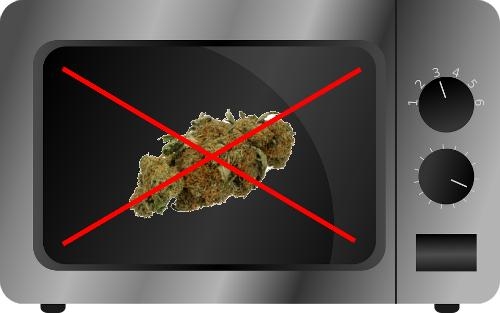
Drying weed in the microwave is an absolute no-go
Weed Cutting Affects Drying
Before we teach you three different drying techniques, we want to discuss weed cutting. After all, the way you cut weed affects the way you can dry weed. So be prepared!
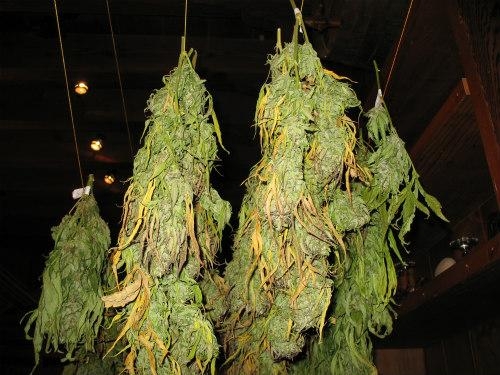
There are two ways of cutting weed: dry cutting or wet cutting. With dry cutting you first remove the stem, branches and bract leaves. All that's left are the stalks with buds and sugar leaves on them. You hang the stalks full of weed on a clothesline. For example in a box or grow room (see drying techniques 1 & 2). After the weed has dried you must remove the sugar leaves before you can use it.
With wet cutting you actually do everything at once. You cut everything off the plant until you are left with beautiful buds. The sugar leaves and stalks are already gone. If you cut the weed when it is wet you will not be able to hang it up anymore. That is why you need to use a special drying net to dry your weed buds in (see drying technique 3).
By the way, it is wise to properly prepare weed cutting. Think of a good pair of weed scissors, tables, containers and a suitable room. Want to know more? Read our blog: “ Weed Cutting - Information & Clear Instructions ”.
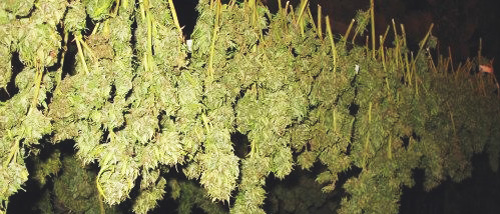
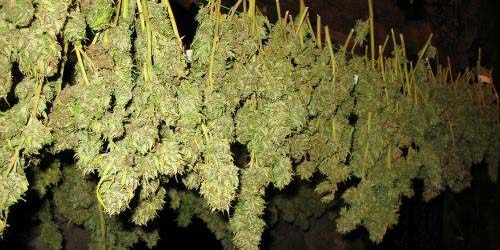
Different Drying Techniques - Drying Weed in a Number of Steps
There are several ways to dry weed. You can choose for yourself which one of the various drying techniques to use. Adapt this to the way you are going to cut the weed plant. It’s convenient to dry weed for example in a box if you’re only drying a small amount. But if you have a large quantity it’s best to dry in a gowing room or by purchasing a drying net. So make your choice by examining the quantity of weed you want to dry. We present the various drying techniques in a nutshell and explain what you need to do in a few steps.
Technique 1: Drying Weed in a Box
You can only use this method if you cut dry weed.
- Use a large shoe box, packing box or some other type of box. This drying technique is suitable for up to approximately 75 grammes of weed (depending, of course, on the size of the box). Have you got more? Then you need a larger space. So choose a different technique.
- Make sure the shoe box is in a dark room at a temperature between 18 and 21 degrees and humidity around 50%.
- Make two holes in the sides of the box and run a string between. If it’s sufficiently large, you can run multiple strings next to each other. At all times ensure that there is sufficient space between the buds. They must not be touching each other, that’s a definite no-no.
- Ensure sufficient ventilation. You can do this by making more holes in the box. Please note: the humidity can rise quickly in a cardboard box. We recommend, particularly at the beginning, to open the box every day and check the conditions. This also provides the buds with some extra fresh air.
Duration: 12 to 20 days.
Technique 2: Drying Weed in a Growing Area
You can only use this method if you cut dry weed.
- Did you cultivate indoors? If so, the growing area is an excellent place for drying weed as quickly as possible. Provided, of course, that it’s dark there. So switch off the lamps.
- Make sure the temperature is between 18 and 21 degrees and the humidity around 50%. Before you start drying, check that there are no vermin or other creatures present in the room.
- Do you want to avoid nuisance from the odour of the weed? If so, we recommend you purchase and install a carbon filter.
- Ensure sufficient ventilation. Mount a fan to bring fresh air into the growing area. Please note: don’t put the fan right next to the weed.
- Run a number of strings across the growing area or buy a drying rack. Hang the buds upside down from the strings or in the rack. Ensure there is sufficient space between each bud.
- Check on the conditions every day. Also keep a good lookout for vermin or diseases. Creatures like spider mites, mealy bugs, aphids or similar can ruin the harvest all too quickly. For more information about these diseases read our blog ‘Critical Diseases‘.
Duration: 10 to 18 days.
Technique 3: Drying Net for weed
You can only use this method if you cut wet weed.
- Buy a drying net (available in single layer or with 8 layers) and hang it up in a dark area. A drying net is especially suitable for drying weed because you can accommodate a large amount of buds in a relatively small space and still maintain enough air. Moreover, the drying process is faster than when you hang up in a box or growing area. Do you have a large quantity of cannabis? If so, then this drying technique is the one recommended.
- Make sure the temperature is between 18 and 21 degrees and the humidity around 50%.
- A drying net is made up of several layers. Spread your weed over the various layers. You put the grit or cutting waste on the bottom layer. Lay the buds slightly apart so that mould gets no opportunity to occur. Because the buds are laying rather than hanging, it’s advisable to turn them over from time to time.
- Ensure sufficient ventilation. If you use a fan, make sure that it’s not pointing directly at the drying net.
- Allow the drying net to do its work. Check each day that the conditions are still ideal, keep an eye out for vermin and allow the weed to dry slowly.
Duration: 8 to 18 days.
How Long does Weed have to Dry for?
As you know from reading the above, the length of time weed has to dry for varies according to technique. We have made an estimate for the various techniques. We have based this on the experience of dozens of growers. All in all, drying weed takes between 8 and 20 days. As a general rule, the longer the weed has been dried, the better the end result. Though it can be shorter due to circumstances.
Snap test
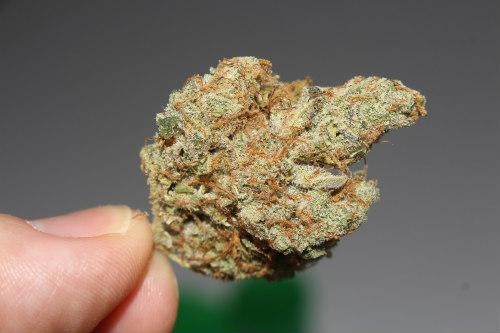
‘How Long does Weed have to Dry for?’ This is not an easy question to answer. But you can test whether your weed is properly dried! You do this by applying the ‘snap test’. Weed is really only properly dried if you can hear the stem/twig snap in one go. Is the twig still bendable? If so, the weed still needs more time to dry properly. It sounds too simple, doesn’t it. And yet this test is very reliable.
Curing Weed after Drying
If you thought that once your weed was dry, you could just relax on the sofa, you’re mistaken. For the best quality weed, it is necessary to let the weed cure. Curing weed is the hardening-off process which optimises its smell, taste and effect. You allow the cannabis to ‘ripen’, as it were. During this ripening process, bacteria get the chance to break down the remaining substances (such as chlorophyll). Furthermore, you can determine the ideal humidity for weed by drying at the correct air humidity.
Curing weed professionally is a tricky business. In this process too, mould can still happen. So be sure to read the instructions carefully and regularly examine your valuable stash. Curing weed can take a long time (up to a good 2 years). It all depends on how much of a perfectionist you are. For good quality cannabis, our recommendation is to cure for around a month.
Vacuum Curing Weed in Tightvac or Weck Preserving Jar
You can only cure weed in an airtight space. Only then can you control the humidity. We recommend an airtight storage jar such as a Tightvac or Weck jar. These jars are hermetically sealed. That means they are airtight and odour-free. The nice thing about a glass Weck jar is that you can always view the contents. A Tightvac, on the other hand, is rather more discreet and thus more suitable if you want to store or conceal it.
Curing weed in a number of steps
- Take an airtight storage jar such as a Tightvac or Weck jar and fill it ? full with weed. The remaining space is needed to allow the air and bacteria to do their work. So don’t completely fill up your jar!
- Put the jar in a cool and dark place. The ideal temperature is the same as for drying weed: 18 to 21 degrees.
- Place a humidity regulator (e.g. Boveda Boost sachets) in the jar. These sachets will ensure that the humidity remains optimal. You can read more information about the ideal humidity for curing and storing weed below.
- Open the jar on a daily basis and check for mould or other undesirable issues. Opening the jar also provides fresh air. Does the jar smell damp and musty? If so, the space is too moist. Adjust this and watch out for mould!
- Every so often, it’s a good idea to empty the weed out of the jar and put it back in. In this way, every part of the bud gets an equal chance at optimal ripening.
- From the fourth week onwards, we recommend you sniff it properly each day. Does the weed smell better than it did prior to curing? If so, then it’s working. But is it still not optimal? In that case, just continue the curing. Don’t forget to replace your humidity regulator if necessary.
Humidity for Curing and Storing Weed
The ideal humidity for curing and storing weed is between 58% and 62%. Humidity regulators which maintain this percentage can be obtained from us.
- We recommend an air humidity of 62% for curing weed because this produces weed with the best smell and taste.
- As far as storing weed is concerned, here personal taste has more of a role to play. Do you like dry weed that burns nice and easily and is also strong? In that case buy the 58% sachets. Or do you just want slightly heavier buds? Then it’s best to choose the 62% sachets.
The humidity regulators from Boveda consist of glycerol and water on a plant base. They self-regulate the humidity, inhibit mould or top rot and prevent loss of smell, taste and potency. On purchase, Boveda sachets are supplied with indicator cards which show you when you need to replace them.
Finished curing weed and curious about how many grammes you’ve cultivated? With one of our Precision Weighing Scales you’ll know exactly how big your harvest is!
Storing Weed
Once you’ve determined the correct humidity of your weed and the smell, taste and potency is optimal then you’re ready to store your weed. As you’ve read, it’s up to you to decide the ideal humidity for this. Anyway, there are a number of products in which you can store your weed. Examples are Tightvac storage containers, Weck jars, sealable bags or zipper bags.
What can you do with your Weed Harvest?
Curious about all the things you could do with your weed harvest? Short of inspiration or on the lookout for new ideas? We’ve written a blog on the things you can do with your harvest. Read the blog ‘8 things you can do with your Harvest‘ and be surprised!